
Introduction
Homemade cookies have an undeniable allure that transcends generations. From the tantalizing aroma wafting through the kitchen to the comforting warmth of freshly baked treats, cookies evoke a sense of nostalgia and joy. Among the myriad of cookie recipes, Sweet Whimsy Cookies stand out as a whimsical and customizable delight, perfect for any occasion. Whether it’s a festive gathering, a birthday celebration, or a cozy afternoon at home, these cookies offer a canvas for creativity and a sprinkle of joy in every bite.
Baking is more than just a culinary art; it serves as a medium for creating cherished memories with loved ones. The process of measuring, mixing, and decorating can transform an ordinary day into a special celebration. Sweet Whimsy Cookies invite bakers of all ages to engage in this delightful experience, encouraging creativity and collaboration. As you gather your ingredients and preheat your oven, you step into a world where imaginations run wild, and every cookie becomes a personal masterpiece.
The Allure of Sweet Whimsy Cookies
What makes Sweet Whimsy Cookies truly enchanting is their delightful texture and rich flavor profile. These cookies strike a perfect balance between chewy and crispy, with a slight crunch on the edges and a soft, tender center. They possess a buttery richness that melts in your mouth, complemented by just the right amount of sweetness. Each bite offers a comforting embrace, making them irresistible to both young and old.
Their versatility is another reason why Sweet Whimsy Cookies are a favorite among bakers. They can seamlessly fit into any occasion—be it a cheerful birthday party, a heartwarming holiday gathering, or a casual get-together with friends. The ability to customize them means you can adapt the flavors and decorations to suit any theme or celebration, allowing you to express your creativity and personal touch.
The joy of decorating cookies adds another layer of fun to the baking process. Imagine the laughter and excitement as friends and family gather around the table, armed with colorful sprinkles, piping bags of royal icing, and an array of edible decorations. It’s an opportunity to bond, share stories, and create lasting memories, all while indulging in the sweet satisfaction of your homemade creations.
Essential Ingredients for Sweet Whimsy Cookies
Creating perfect Sweet Whimsy Cookies starts with the right ingredients. Each element plays a crucial role in building the cookie’s structure, flavor, and overall appeal. Here’s a closer look at the essential ingredients you’ll need:
– All-Purpose Flour: This key ingredient serves as the foundation of the cookie, providing structure and stability. It’s important to measure the flour accurately—too much can lead to dense cookies, while too little can result in a flat outcome.
– Butter: A critical player in any cookie recipe, butter brings richness and flavor. Using unsalted butter allows you to control the saltiness of your cookies, ensuring a well-balanced taste. The butter must be softened to room temperature, which helps in achieving that perfect texture during the creaming process.
– Sugar: The sweet element of the recipe, sugar not only provides sweetness but also contributes to the cookie’s delightful crunch. A combination of granulated sugar and brown sugar elevates the flavor profile, adding depth and moisture.
– Eggs: Eggs act as a binding agent, providing moisture and stability to the cookies. They help the cookies rise and hold their shape during baking. It’s essential to use large eggs at room temperature for the best results.
In addition to these core ingredients, there are optional elements that can elevate your Sweet Whimsy Cookies to a new level:
– Almond Extract: Adding a splash of almond extract introduces a unique flavor twist that pairs beautifully with the sweetness of the cookies. It can provide a delightful contrast that makes your cookies stand out.
– Lemon Zest: A hint of lemon zest can brighten up the flavor profile, adding a refreshing touch that complements the richness of the butter and sugar.
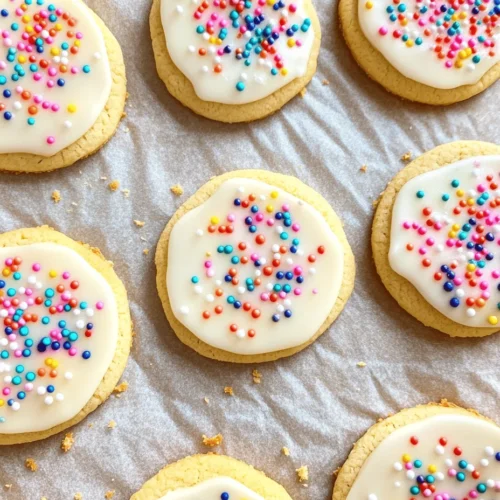
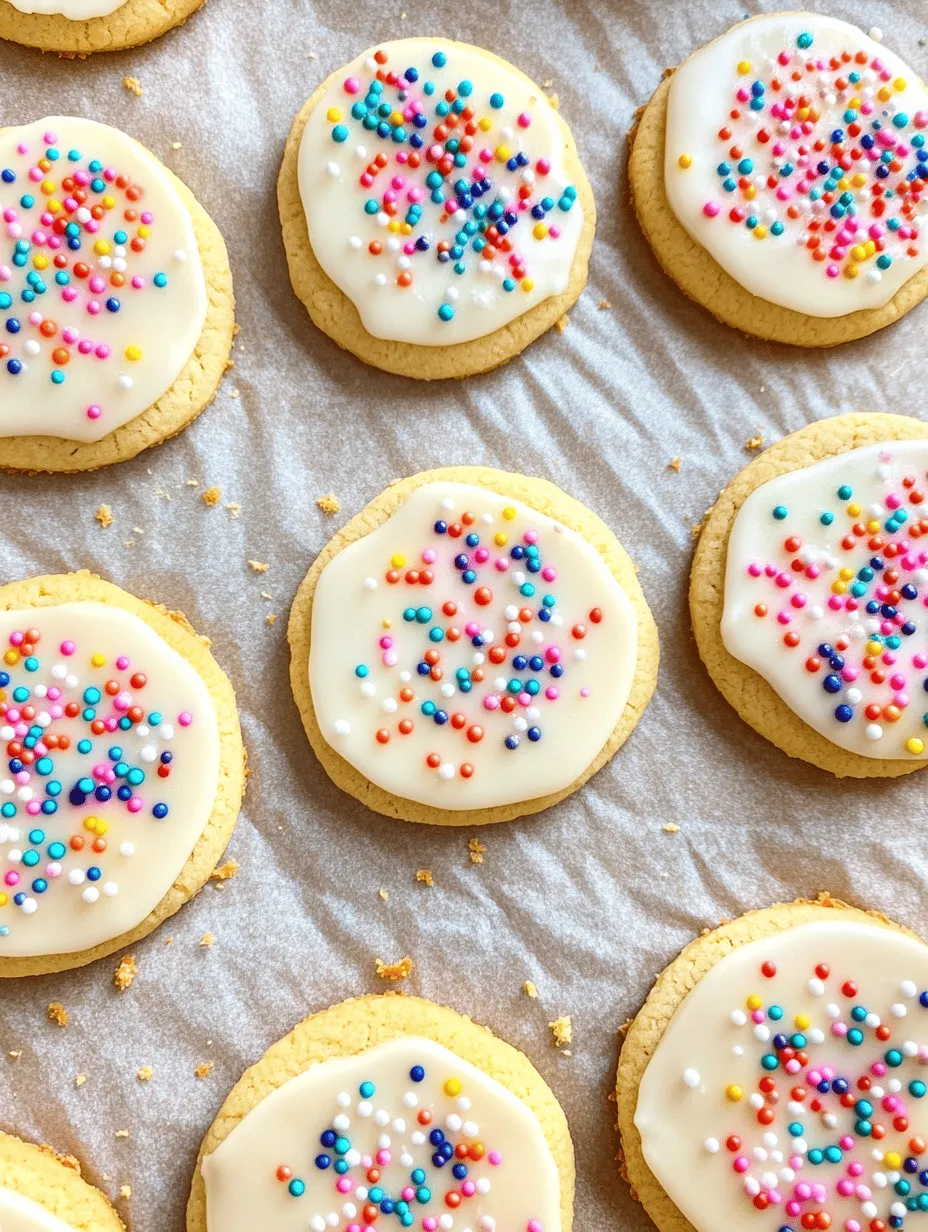
– Colorful Sprinkles and Royal Icing: These decorative elements not only enhance the visual appeal but also allow for creativity in presentation. Use vibrant sprinkles to celebrate special occasions or create themed cookies with intricate designs using royal icing.
Step-by-Step Guide to Making Sweet Whimsy Cookies
Now that you have all your ingredients assembled, it’s time to embark on the exciting journey of baking Sweet Whimsy Cookies. Follow this step-by-step guide to ensure your cookies turn out perfect every time.
Preheat the Oven
The first step in your cookie-making adventure is to preheat your oven to 350°F (175°C). Proper preheating is essential for even baking, allowing your cookies to rise beautifully and develop that coveted golden-brown color. While the oven is warming up, you can prepare your cookie dough, ensuring a seamless transition from mixing to baking.
Mixing Dry Ingredients
In a medium-sized bowl, combine your dry ingredients: all-purpose flour, baking powder, and a pinch of salt. Whisk them together thoroughly until they are well blended. This step ensures even distribution of the leavening agents and salt, which is crucial for achieving a balanced mixture. Set this bowl aside while you focus on the wet ingredients.
Creaming Butter and Sugar
In a large mixing bowl, add the softened butter and granulated sugar. Using an electric mixer, cream them together on medium speed until the mixture is light and fluffy, typically about 3-4 minutes. This process incorporates air into the butter, which helps create a tender texture in the final product. The sugar granules should dissolve into the butter, leaving you with a smooth, creamy base.
Once the butter and sugar are well combined, add the brown sugar and continue mixing until everything is thoroughly incorporated. The addition of brown sugar not only enhances the flavor but also adds moisture, resulting in a chewy cookie texture.
Incorporating Wet Ingredients
Next, crack in the eggs, one at a time, mixing well after each addition. This step allows the eggs to fully integrate into the buttery sugar mixture, providing the necessary moisture and binding properties. If you are using almond extract or lemon zest, now is the time to add them as well. Mix everything together until just combined, ensuring the batter is smooth and well blended.
After the wet ingredients are incorporated, gradually add the dry mixture to the wet mixture, mixing on low speed until just combined. Be careful not to overmix; you want to maintain the light and airy texture of the dough. Once the flour is just incorporated, you can fold in any additional mix-ins, such as chocolate chips or nuts, if desired.
With your dough prepared, you are now ready to shape and decorate your Sweet Whimsy Cookies, which will be a delightful continuation of this baking adventure. Stay tuned for the next steps, where we will explore the fun of shaping and decorating these whimsical treats!

Adding Dry Ingredients
Once your wet ingredients are creamy and well combined, it’s time to incorporate the dry ingredients into your Sweet Whimsy Cookies dough. This step is crucial for achieving the perfect texture. Begin by sifting together your flour, baking powder, and salt in a separate bowl. Sifting helps to aerate the flour and eliminates lumps, ensuring a smooth batter.
When adding the dry ingredients to the wet mixture, use a gentle folding technique rather than vigorous stirring. This method helps maintain a light and airy dough, which is essential for cookies that are tender and not overly dense. A rubber spatula works best for this task. As you fold, be cautious not to overmix; it’s okay if there are a few small streaks of flour remaining. The goal is to bring the dough together without developing too much gluten, which can lead to tough cookies.
Chilling the Dough
Chilling the dough is an often-overlooked step that can significantly affect the shape and texture of your cookies. When you chill the dough, the fats solidify, which helps the cookies maintain their shape while baking. Without this step, your Sweet Whimsy Cookies may spread too much in the oven, resulting in flat and crispy edges rather than soft and chewy centers.
Aim to chill the dough for at least 30 minutes, but if you have the time, letting it rest in the refrigerator for up to an hour can yield even better results. This time allows the flavors to meld and increases the chewiness of the cookies. Once chilled, you can proceed to roll out the dough, which will be easier to manage and shape.
Rolling Out the Dough
To achieve uniform cookie thickness, rolling out the dough can be a fun and satisfying step. Start by dusting your work surface with a light coating of flour to prevent sticking. Divide the chilled dough into manageable portions; this makes it easier to roll out and helps maintain even thickness.
Using a rolling pin, gently roll the dough to about ¼ inch thick. If you want to ensure uniformity, consider using rolling pin rings or guides that are designed to help achieve the same thickness across the dough. After rolling, use cookie cutters to cut out your Sweet Whimsy Cookies into your desired shapes. Carefully transfer the cut cookies onto a baking sheet lined with parchment paper, leaving sufficient space between each cookie to allow for slight spreading during baking.
Baking the Cookies
Baking is where the magic happens. Preheat your oven to 350°F (175°C) and place the baking sheets filled with cookies in the oven once it’s ready. It’s essential to keep a close eye on the baking time, which typically ranges from 10 to 12 minutes, depending on your oven and the size of the cookies.
Signs that your Sweet Whimsy Cookies are done include a light golden color around the edges and a slightly soft center that will firm up as they cool. For a perfect bake, try to rotate your baking sheets halfway through for even cooking, especially if your oven has hot spots. Once baked, allow the cookies to cool on the sheet for a few minutes before transferring them to a wire rack to cool completely.
Decorating the Cookies
Now comes the fun part: decorating your Sweet Whimsy Cookies! Decorating can turn simple cookies into stunning creations. Royal icing is a popular choice for cookie decoration due to its smooth finish and versatility. To make royal icing, beat together powdered sugar, meringue powder, and water until it reaches a smooth, spreadable consistency. You can tint the icing with food coloring to match your theme.
Once your cookies have cooled completely, you can begin piping the royal icing onto the surface. For added flair, sprinkle edible glitter or colorful sprinkles on top before the icing sets. You can also use a toothpick or a skewer to create designs in the icing or to swirl colors together for a whimsical effect. Encourage creativity—each cookie can be a unique masterpiece!
Baking Tips for Perfect Sweet Whimsy Cookies
To ensure your Sweet Whimsy Cookies turn out perfectly every time, there are a few essential tips to keep in mind:
1. Ingredient Temperature: Using room temperature butter and eggs is crucial for optimal mixing. Cold ingredients can lead to a lumpy batter and affect how well the cookies hold their shape.
2. Baking Time Adjustments: Keep in mind that baking times can vary based on cookie size and oven variances. If you’re using larger or smaller cookie cutters, adjust the baking time accordingly. It’s better to check for doneness a couple of minutes early than to risk overbaking.
3. Storage Suggestions: To maintain the freshness and flavor of your cookies, store them in an airtight container at room temperature. If you want to keep them for an extended period, consider freezing them. Simply place the baked cookies in a single layer on a baking sheet to freeze, then transfer them to a freezer-safe container once solid.
Creative Variations on Sweet Whimsy Cookies
Once you’ve mastered the classic Sweet Whimsy Cookies, you can explore a variety of creative twists:
1. Flavor Variations: For a chocolatey delight, consider adding cocoa powder to the dough. Start with ¼ cup and adjust according to your preference. You can also incorporate nuts, such as chopped pecans or walnuts, or dried fruits like cranberries or cherries for added texture and flavor.
2. Seasonal Variations: Adapt your decorations and flavors according to the season. For instance, use pumpkin spice in the fall or peppermint extract during the winter holidays. You can also create themed cookie designs for celebrations—think pastel colors and bunny shapes for Easter or spooky designs for Halloween.
The Joy of Baking and Sharing Cookies
Baking is not just a kitchen activity; it’s a way to create lasting memories and connections with others. The act of baking cookies can bring family and friends together, whether you’re baking side by side in the kitchen or surprising someone with a batch of homemade treats.
Sharing cookies is a time-honored tradition that fosters connections. Whether you’re gifting a box of Sweet Whimsy Cookies to a neighbor, bringing them to a potluck, or simply enjoying them with loved ones, these delightful treats can brighten someone’s day. Personal anecdotes about baking with family can enrich the experience—perhaps recalling a time when you and a sibling decorated cookies for a holiday together.
Conclusion
The journey of creating Sweet Whimsy Cookies—from mixing the batter to decorating the finished product—is filled with joy and creativity. As you embrace the art of baking, remember that each cookie is not just a treat; it’s a piece of love and creativity that can enhance any celebration or everyday moment.
So, gather your ingredients, invite your friends or family to join, and let the magic of baking fill your kitchen with warmth and happiness. Homemade cookies have a lasting impact, not just on your taste buds but also in the memories created around them. Happy baking, and may your Sweet Whimsy Cookies bring joy to all who taste them!