

In the world of baking, few things are as satisfying as the aroma of freshly baked bread wafting through your home. The mere thought of pulling a warm, crusty loaf from the oven can evoke a sense of comfort and nostalgia. While traditional oven-baked bread has its charm, stovetop bread offers a quick and easy alternative that can yield delightful results. Enter Stovetop Wonder Bread—a simple yet flavorful recipe that requires minimal ingredients and equipment, perfect for novice bakers and seasoned chefs alike.
This article will explore the intricacies of making Stovetop Wonder Bread, ensuring you achieve a perfectly golden loaf every time. Whether you’re looking to whip up a last-minute side for dinner or indulge in the satisfying process of bread-making, this stovetop method will help you create a warm, delicious loaf with ease.
Understanding the Ingredients: What Makes Stovetop Wonder Bread Unique
To create a delightful loaf of Stovetop Wonder Bread, understanding the ingredients is crucial. Each component plays a vital role in shaping the flavor and texture of the final product. Let’s delve into the key ingredients that make this bread unique.
Exploring All-Purpose Flour
All-purpose flour is the backbone of this recipe, providing the essential gluten structure required for bread. Its versatility makes it a staple in many kitchens. Unlike bread flour, which has a higher protein content, all-purpose flour strikes a balance, allowing for a tender crumb while still giving the bread enough structure to rise. When measuring flour, be sure to aerate it first by spooning it into the measuring cup rather than scooping directly from the bag; this will prevent your bread from becoming dense.
The Importance of Baking Powder
In this stovetop recipe, baking powder serves as the leavening agent. Unlike yeast, which requires time to ferment and rise, baking powder provides an instant lift to the dough. It works by releasing carbon dioxide when combined with moisture and heat, creating a light and fluffy texture. This is particularly advantageous for those who may not have the time or patience for traditional yeast bread-making. A proper balance of baking powder is essential—too much can result in a soapy taste, while too little can leave your bread flat.
Salt and Sugar: Balancing Flavors
Salt and sugar are two ingredients that might seem insignificant but are vital in enhancing the flavor of the bread. Salt not only adds taste but also regulates yeast activity and strengthens gluten structure. Sugar, on the other hand, plays a dual role: it provides sweetness and aids in browning. The Maillard reaction, which occurs when sugar is heated, produces that appealing golden crust we all love. For this recipe, a small amount of sugar is sufficient to balance the flavors without making the bread overly sweet.
Milk vs. Buttermilk: Choosing the Right Liquid
The liquid used in the recipe can significantly impact the flavor and texture of your bread. While traditional recipes often call for milk, using buttermilk can elevate your Stovetop Wonder Bread to new heights. Buttermilk contributes a subtle tanginess and reacts with the baking powder to create an even lighter texture. If you opt for milk, consider adding a splash of vinegar or lemon juice to mimic the acidity of buttermilk. The choice between these liquids comes down to personal preference; both will yield delicious results.
The Role of Butter and Optional Seasonings
Melted butter is another key player in this recipe. It enriches the dough, contributing to a moist and tender crumb. Butter also adds a delightful flavor that complements the other ingredients beautifully. Additionally, you can experiment with optional seasonings such as herbs, garlic powder, or sesame seeds to elevate your bread further. These additions can transform a basic loaf into something extraordinary, allowing you to tailor the flavor profile to your liking.
Preparation Steps: Crafting Your Stovetop Wonder Bread
Now that you understand the importance of each ingredient, it’s time to roll up your sleeves and start crafting your Stovetop Wonder Bread. The preparation process is straightforward and can be accomplished in a few simple steps. Follow along to create a loaf that will impress both friends and family.
Mixing the Dry Ingredients
The first step in making Stovetop Wonder Bread is mixing the dry ingredients. Begin by measuring out your all-purpose flour, baking powder, salt, and sugar. It’s essential to sift these ingredients together into a large mixing bowl. Sifting not only helps to aerate the flour, resulting in a lighter texture, but it also ensures that the baking powder and salt are evenly distributed throughout the flour. This is a crucial step, as uneven distribution can lead to inconsistent rising and flavor in your bread.
Once you’ve sifted the dry ingredients, take a moment to whisk them together gently. This extra step will help to further combine the ingredients and remove any lumps. The goal here is to create a homogeneous mixture that will form the foundation of your dough.
Creating the Dough: Techniques for Success
With your dry ingredients well mixed, it’s time to create the dough. Start by making a well in the center of your dry mixture. This well will act as a reservoir for your wet ingredients, allowing them to be incorporated gradually. In a separate bowl, whisk together your chosen liquid—either milk or buttermilk—and melted butter. Pour this mixture into the well you created in the dry ingredients.
Using a spatula or wooden spoon, gently combine the wet and dry ingredients. Be careful not to overmix; you want the dough to come together without developing too much gluten. Overmixing can lead to a tough bread, which is not the desired outcome. The dough should be slightly sticky but cohesive, holding together well without falling apart.
Kneading: The Key to Texture
Once your dough has come together, it’s time to knead. Kneading is a critical step that helps develop gluten, giving your bread structure and chew. To knead, turn the dough out onto a lightly floured surface. With floured hands, gently press the dough down, fold it over itself, and turn it a quarter turn. Repeat this process for about 5-7 minutes.
You want the dough to become smooth and elastic. If it sticks to your hands or the work surface, dust it lightly with more flour; however, be mindful not to add too much flour, as this can alter the bread’s texture. The goal is to create a soft, pliable dough that springs back when lightly pressed.
This kneading technique is essential for achieving the right texture in your Stovetop Wonder Bread. It’s a satisfying process that connects you directly to the craft of bread-making, ensuring your final product will be both delicious and visually appealing.
As you continue this journey of creating Stovetop Wonder Bread, the following sections will guide you through cooking techniques and tips for perfecting your loaf. With a focus on simplicity and flavor, this recipe is designed to bring joy to your kitchen while expanding your baking repertoire.

Shaping the Dough: Rounds vs. Discs
When it comes to shaping your dough for Stovetop Wonder Bread, you have a couple of fun options: rounds and discs. Each shape not only affects the cooking time but also influences the presentation of your final product.
Rounds: Shaping the dough into balls creates a round loaf that is soft and fluffy. This shape tends to cook evenly and is perfect for slicing into thick rounds for sandwiches or toasting. However, be mindful that the thicker the round, the longer it will take to cook through.
Discs: Flattening the dough into discs can produce a more rustic, flatbread-style loaf. This shape allows for quicker cooking times since the bread has a larger surface area exposed to the heat. Discs can be ideal for serving alongside soups or stews, providing a delightful texture that complements a variety of meals.
Ultimately, the choice between rounds and discs comes down to personal preference and how you plan to serve the bread. Regardless of shape, the key is to ensure even thickness throughout the dough to achieve consistent cooking results.
Cooking Process: Mastering the Stovetop Method
Preheating the Skillet: Why Temperature Matters
The first critical step in the stovetop cooking process is preheating your skillet. This is no mere suggestion; it’s essential for achieving that perfect golden-brown crust that we all crave. A properly preheated skillet allows the bread to start cooking immediately upon contact, creating a nice sear that locks in moisture and flavor.
To preheat, set your skillet over medium heat and allow it to warm for a few minutes. You can test if the skillet is ready by flicking a few drops of water onto the surface; if they sizzle and evaporate quickly, you’re good to go. Remember, different stovetops can vary in temperature, so keep an eye on the heat and adjust as necessary during cooking.
Greasing: Techniques for Nonstick Success
Once your skillet is preheated, it’s time to grease it properly to ensure your bread releases easily. Using a generous amount of butter or oil is critical. For a nonstick success, consider the following techniques:
1. Butter: Melt a tablespoon of butter in the skillet before adding your dough. This not only helps with nonstick properties but also adds a rich flavor to the crust.
2. Oil: If you prefer oil, opt for a neutral flavored oil like canola or vegetable oil. Use a paper towel to spread a thin layer evenly across the skillet.
3. Nonstick Spray: For a fuss-free option, nonstick cooking spray can be effective. Just be sure to coat the skillet generously to avoid any sticking.
Regardless of the method you choose, ensure that the skillet is evenly greased to promote an even cooking surface and a beautiful crust.
Cooking the Bread: Timing and Technique
Now comes the exciting part—the actual cooking! Once you’ve shaped your dough and greased the skillet, carefully place the rounds or discs into the skillet.
1. Cook on Medium Heat: Maintain a medium heat to allow the bread to cook evenly without burning. Cooking times can vary based on the thickness of your dough, but generally, you’ll want to cook each side for about 5 to 7 minutes.
2. Monitor Doneness: Keep an eye on the bottom of the bread as it cooks. You’re looking for a lovely golden-brown color before flipping. Use a spatula to gently lift the edge of the bread to check for color.
3. Flip with Care: When it’s time to flip, use a wide spatula to support the bread fully. This reduces the risk of tearing the crust and ensures a uniform cook on the other side.
4. Final Cooking Time: After flipping, continue to cook for an additional 5 to 7 minutes. The bread is done when both sides are golden brown and the center feels firm to the touch.
Finishing Touches: Adding Flavor and Presentation
Cooling and Brushing with Butter
Once your Stovetop Wonder Bread is cooked to perfection, it’s time for a couple of finishing touches that elevate both flavor and presentation. Carefully transfer the bread to a cooling rack or a plate. Allow it to cool for a few minutes, which helps set the texture.
While still warm, brush the top of your bread with melted butter. This not only adds a luscious richness but also enhances the crust’s appeal, giving it a beautiful glossy finish.
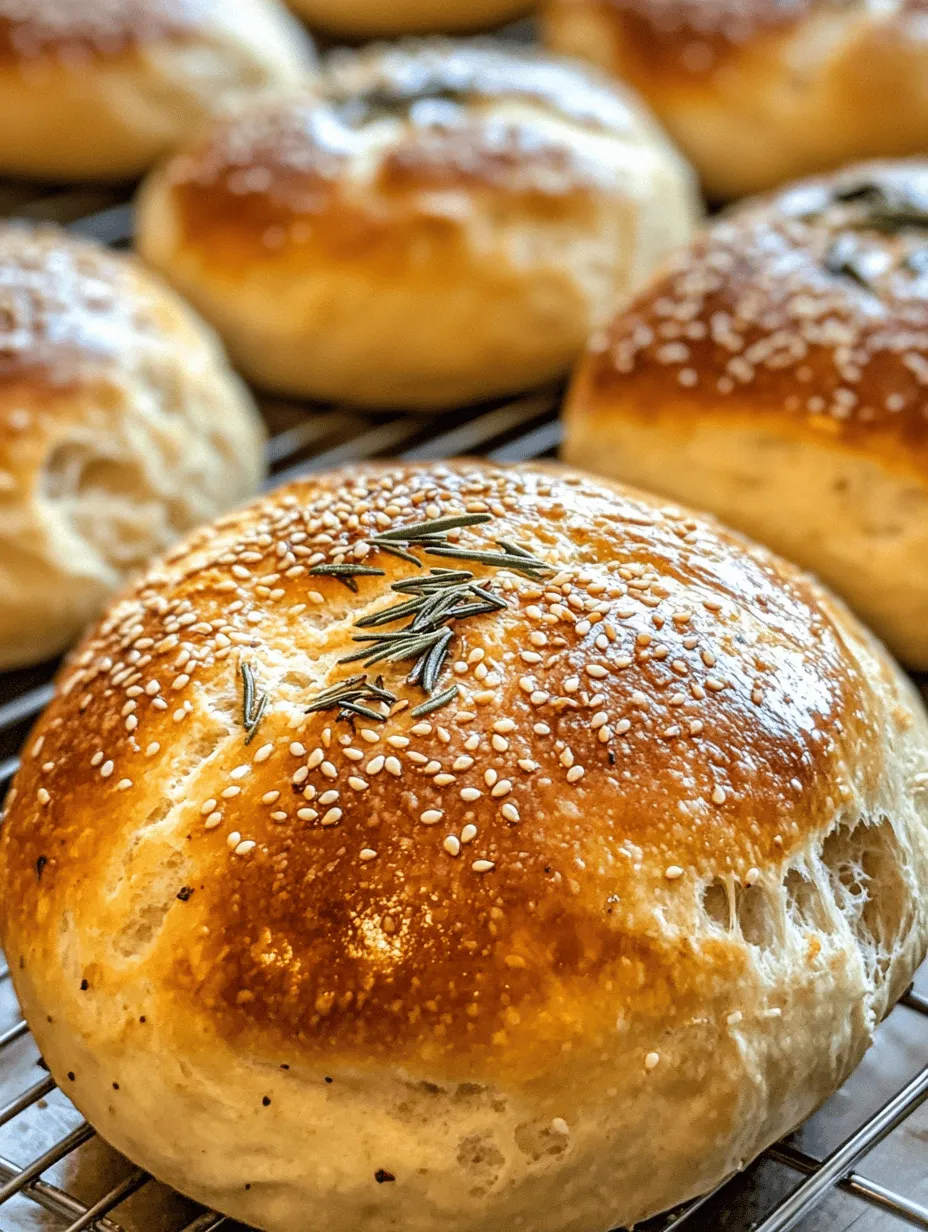
Optional Toppings: Herbs and Seeds
For an extra layer of flavor and visual appeal, consider adding toppings before the bread cools. Here are some options:
– Herbs: Finely chopped fresh herbs like rosemary, thyme, or parsley can be sprinkled on top for a burst of freshness.
– Seeds: A sprinkle of sesame seeds or poppy seeds adds a delightful crunch and a nutty flavor.
These toppings can be a simple yet effective way to customize your Stovetop Wonder Bread and make it uniquely yours.
Serving Suggestions: Enjoying Your Stovetop Wonder Bread
Pairing with Spreads: A World of Flavor
One of the joys of homemade bread lies in its versatility when it comes to toppings. Here are a few delightful spreads and toppings that can elevate your Stovetop Wonder Bread experience:
– Classic Butter: Sometimes, nothing beats a good pat of butter melting into warm bread.
– Jam or Marmalade: Sweet spreads like strawberry jam or orange marmalade offer a lovely contrast to the savory bread.
– Cream Cheese: For a richer option, spread a thin layer of cream cheese and top with sliced cucumbers or smoked salmon.
– Avocado: Mash up some avocado with a sprinkle of salt and lemon juice for a nutritious and flavorful topping.
Incorporating into Meals: Versatility of Stovetop Bread
Stovetop Wonder Bread can be seamlessly integrated into various meals. Here are some creative ideas:
– Sandwiches: Use slices of the bread to create hearty sandwiches. Fill them with your favorite meats, cheeses, and veggies for a satisfying lunch.
– Breakfast Toasts: Top a slice with scrambled eggs and sautéed spinach for a delightful breakfast option.
– Side Dish: Serve alongside soups or stews, allowing the bread to soak up those delicious flavors.
– Dipping: Cut the bread into strips and serve with olive oil and balsamic vinegar for a simple yet elegant appetizer.
Conclusion: The Satisfaction of Homemade Stovetop Wonder Bread
Homemade Stovetop Wonder Bread is not just a recipe; it’s a culinary adventure that brings the joy of baking right into your kitchen without the need for an oven. The process of creating this bread from scratch is incredibly satisfying, allowing you to enjoy the delightful aroma and taste of freshly baked bread.
Experimenting with different shapes, toppings, and serving suggestions means that you’ll never tire of this versatile recipe. Whether you enjoy it as a simple snack with butter or elevate it to gourmet sandwiches, this bread can fit seamlessly into any meal.
So, gather your ingredients and let your creativity shine. Make this Stovetop Wonder Bread your own, and enjoy the delicious rewards of your homemade creation. There’s something truly special about breaking bread with loved ones, and your homemade wonder bread is sure to be a hit at any table. Happy cooking!
