
Introduction
Sushi has captured the hearts and palates of food enthusiasts around the globe, evolving from its humble origins in Japan to become a staple in culinary culture. Renowned for its delicate flavors, artistic presentation, and fresh ingredients, sushi represents a harmonious blend of tradition and innovation. Among the various forms of sushi, baked sushi rolls have emerged as a delectable twist, offering a unique texture and flavor profile that appeals to those seeking a warm, comforting alternative to traditional raw sushi.
One of the most popular variations of baked sushi rolls is the baked salmon sushi roll. This dish not only satisfies the taste buds with its rich, savory flavors but also boasts numerous health benefits. Salmon is a powerhouse of nutrients, rich in omega-3 fatty acids, high-quality protein, and essential vitamins, making it a fantastic choice for a healthy meal. Paired with fresh vegetables and perfectly seasoned sushi rice, baked salmon sushi rolls offer a delightful combination of taste and nutrition.
In this article, readers can expect to find a comprehensive guide to making baked salmon sushi rolls. From detailed instructions on preparation to helpful tips and variations, this recipe promises to enhance your culinary repertoire and impress your family and friends.
Understanding Sushi
Sushi is more than just a dish; it is a cultural icon that embodies the artistry and precision of Japanese cuisine. Traditionally, sushi dates back centuries, originating as a method of preserving fish in fermented rice. Over time, it has evolved into various forms, including nigiri, sashimi, and maki, each with its distinct characteristics. The global influence of sushi has led to a myriad of adaptations, with chefs worldwide experimenting with flavors and ingredients to create innovative dishes.
One notable adaptation is the baked sushi roll. Unlike traditional sushi, which often features raw fish and cold ingredients, baked sushi rolls are typically assembled with cooked or baked components. This approach not only introduces new flavors but also caters to those who may be hesitant about consuming raw fish. The baking process enhances the taste and texture of ingredients, resulting in a comforting and satisfying meal.
The ingredients that make up sushi rolls are not only delicious but also packed with health benefits. Salmon, for instance, is renowned for its omega-3 fatty acids, which are linked to heart health, brain function, and reduced inflammation. Additionally, sushi rolls often incorporate vegetables such as avocado and cucumber, which provide essential vitamins and minerals, as well as dietary fiber. This combination of ingredients makes sushi a versatile and nutritious meal option.
Ingredients Breakdown
Creating the perfect baked salmon sushi roll requires fresh, high-quality ingredients. Each component plays a vital role in achieving the desired flavor and texture. Here’s a detailed breakdown of the essential ingredients:
1. Sushi Rice: The foundation of any sushi roll, sushi rice is a short-grain rice that becomes sticky when cooked, allowing it to hold together when rolled. When prepared correctly, sushi rice has a slightly chewy texture that complements the other ingredients. Nutritionally, sushi rice is a good source of carbohydrates, providing the energy needed for an active lifestyle.
2. Fresh Salmon: The star of this recipe, salmon should be of the highest quality, ideally sushi-grade. This ensures safety and enhances the flavor. Salmon is rich in omega-3 fatty acids, which are crucial for heart health and brain function. When selecting salmon, look for vibrant color and a fresh smell; avoid any fish that appears dull or has an off-putting odor.
3. Nori: Nori is the seaweed sheet that holds the sushi roll together. It adds a unique umami flavor and crunchy texture to the dish. High-quality nori should be dark green and shiny, with a slightly crisp texture. When working with nori, it’s important to keep it dry to prevent it from becoming soggy.
4. Vegetables: Common vegetables used in baked salmon sushi rolls include avocado and cucumber. Avocado adds a creamy texture and rich flavor, while cucumber provides a refreshing crunch. Both vegetables are low in calories and high in essential nutrients, making them excellent additions to the roll.
5. Cream Cheese (optional): For those who enjoy a creamy texture, cream cheese can be included in the sushi roll. It adds a rich, tangy flavor that complements the salmon and balances the other ingredients. However, this ingredient is optional and can be excluded for a lighter version of the roll.
6. Seasoning: The seasoning for sushi rice typically includes rice vinegar, sugar, and salt. This combination enhances the flavor of the rice and adds a touch of acidity that balances the richness of the salmon and cream cheese.
Preparation Steps
Preparing the Sushi Rice
The first step in making baked salmon sushi rolls is preparing the sushi rice. Properly cooked sushi rice is crucial for achieving the right texture and flavor in your rolls. Here’s a step-by-step guide to preparing sushi rice:
1. Rinsing the Sushi Rice: Begin by measuring the desired amount of sushi rice (typically around 2 cups for a standard batch) and rinsing it under cold water. This step is essential to remove excess starch, which can make the rice gummy. Rinse the rice until the water runs clear, indicating that most of the starch has been removed.
2. Cooking the Rice: Once rinsed, place the sushi rice in a rice cooker or a pot with a lid. For every cup of sushi rice, add approximately 1.2 cups of water. Allow the rice to soak for about 30 minutes, as this helps achieve a tender texture. Then, cook the rice according to your rice cooker’s instructions or bring it to a boil on the stove, reduce the heat to low, cover, and simmer for about 18-20 minutes. Avoid lifting the lid during cooking, as this can affect the cooking process.
3. Fluffing the Rice: After cooking, let the rice sit covered for an additional 10 minutes to allow it to steam. Then, remove the lid and fluff the rice gently with a wooden spatula or rice paddle. This helps to separate the grains and prevent clumping.
Seasoning the Rice
After preparing the sushi rice, it’s time to season it. The seasoning process is what elevates the flavor of the rice and makes it an integral part of the sushi roll.
1. Mixing the Seasoning: In a small bowl, combine ¼ cup of rice vinegar, 2 tablespoons of sugar, and 1 teaspoon of salt. Stir until the sugar and salt are fully dissolved.
2. Incorporating the Seasoning: Transfer the cooked rice to a large bowl or a wooden sushi tub (hangiri) if you have one. While the rice is still warm, gradually drizzle the vinegar mixture over the rice. Using a gentle folding motion, mix the rice and seasoning together, taking care not to mash the grains. The goal is to coat each grain of rice evenly without crushing them.
3. Cooling the Rice: As you mix, use a fan or a piece of cardboard to cool the rice down to room temperature. This step gives the rice a glossy finish and helps it stick together when rolling.
Baking the Salmon
Now that the sushi rice is ready, it’s time to prepare the salmon. Baking the salmon not only enhances its flavor but also adds a deliciously flaky texture that pairs beautifully with the other ingredients.
1. Prepping the Salmon: Start with fresh, sushi-grade salmon fillets. If desired, you can marinate the salmon in a mixture of soy sauce, sesame oil, and a touch of honey for added flavor. Let it marinate for about 15-30 minutes to infuse the flavors.
2. Baking the Salmon: Preheat your oven to 375°F (190°C). Line a baking sheet with parchment paper to prevent sticking. Place the marinated salmon fillets on the baking sheet, skin-side down, and bake for about 12-15 minutes, or until the salmon is cooked through and flakes easily with a fork. Be careful not to overcook the salmon, as this can lead to a dry texture.
3. Flaking the Salmon: Once baked, remove the salmon from the oven and let it cool slightly. Using a fork, gently flake the salmon into bite-sized pieces, being careful to remove any skin or bones. The flaked salmon will be incorporated into the sushi rolls, adding a rich, savory flavor to the final dish.
With the sushi rice prepared, properly seasoned, and the salmon baked to perfection, you’re well on your way to creating delicious baked salmon sushi rolls. In the next section, we will cover the assembly process and additional tips to ensure your sushi rolls turn out beautifully every time.
Suggestions for Alternative Cooking Methods
While baking your salmon sushi roll is a fantastic way to achieve that perfect melt-in-your-mouth texture, there are other equally delicious cooking methods to consider. Each method brings a unique flavor profile and texture to the salmon, allowing you to tailor your sushi rolls to your personal preference.
Grilling: Grilling the salmon imparts a smoky flavor that can elevate your sushi rolls. Simply preheat your grill and place the salmon fillets on a lightly oiled grill grate. Grill for about 4-6 minutes on each side, or until fully cooked. Once grilled, allow the salmon to rest before assembling your sushi.
Pan-Searing: For those who prefer a quick and effective method, pan-searing the salmon is a great option. Heat a non-stick skillet over medium-high heat, add a little oil, and place the salmon skin-side down. Sear for about 3-4 minutes, then flip and cook for an additional 3-4 minutes until the salmon is cooked through. This method creates a deliciously crispy skin that adds texture to your sushi rolls.
Assembling the Sushi Rolls
Now that your salmon is cooked to perfection, it’s time to assemble your sushi rolls. The assembly process is crucial for ensuring that your sushi holds together well and presents beautifully.
Using a Bamboo Sushi Mat: A bamboo sushi mat is an essential tool for rolling sushi. Place your mat on a clean, flat surface and lay a sheet of nori (seaweed) on top, shiny side down. This will be the outer layer of your sushi roll.
Spreading Rice Evenly: With wet hands (to prevent sticking), take a handful of sushi rice and spread it evenly over the nori, leaving about 1 inch of space at the top edge. The rice should be approximately 1/4 inch thick. This even layer will help the sushi hold together and ensure that every bite has a good balance of flavors.
Layering Fillings Effectively: Once the rice is spread, lay your fillings—such as baked salmon, cucumber sticks, and avocado slices—horizontally across the center of the rice. Keep your fillings evenly spaced and avoid overstuffing, as this can make rolling difficult. Remember, the art of sushi-making often lies in simplicity.
Moisture for Preventing Sticking: To keep the rice from sticking to your hands and the mat, wet your fingers frequently while handling the ingredients. This simple trick will make the assembly process much smoother and more enjoyable.
Rolling the Sushi
With the ingredients in place, it’s time to roll your sushi. This step can be tricky, but with practice and the following tips, you’ll be able to create tight and perfectly shaped rolls.
Step-by-Step Guide to Rolling Sushi:
1. Start at the edge of the mat closest to you. Lift the mat and begin to roll it away from you, pressing down gently to form a tight cylinder.
2. Once you reach the edge of the nori, dampen it with a little water to seal the roll. Press firmly to ensure it stays closed.
3. Use the sushi mat to shape the roll further; gently press and roll it back and forth until it forms a nice cylindrical shape.
Common Mistakes to Avoid:
– Overstuffing: Too much filling can make rolling difficult and lead to spills. Aim for a balanced amount of rice and fillings.
– Not Sealing Properly: Ensure the edge of the nori is dampened to help seal the roll. A well-sealed roll is essential for presentation and taste.
Slicing the Rolls
Once your sushi rolls are complete, it’s time to slice them into perfect pieces. Slicing can be an art itself, and doing it correctly will enhance the overall presentation.
Techniques for Slicing Sushi Rolls Cleanly:
– Use a sharp knife to ensure clean cuts. A dull knife can crush the roll and make it difficult to slice evenly.
– Wet the knife with water before cutting to prevent sticking, which can also improve the appearance of each slice.
Importance of Maintaining Sharpness: A sharp knife is crucial not just for cutting sushi but for all types of cooking. Regularly sharpen your knife or use a honing steel before slicing to maintain its effectiveness.
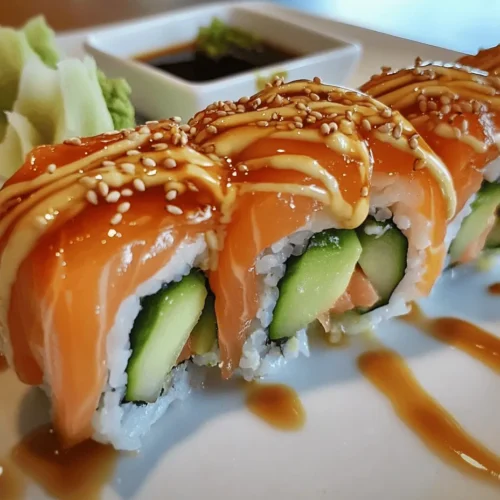
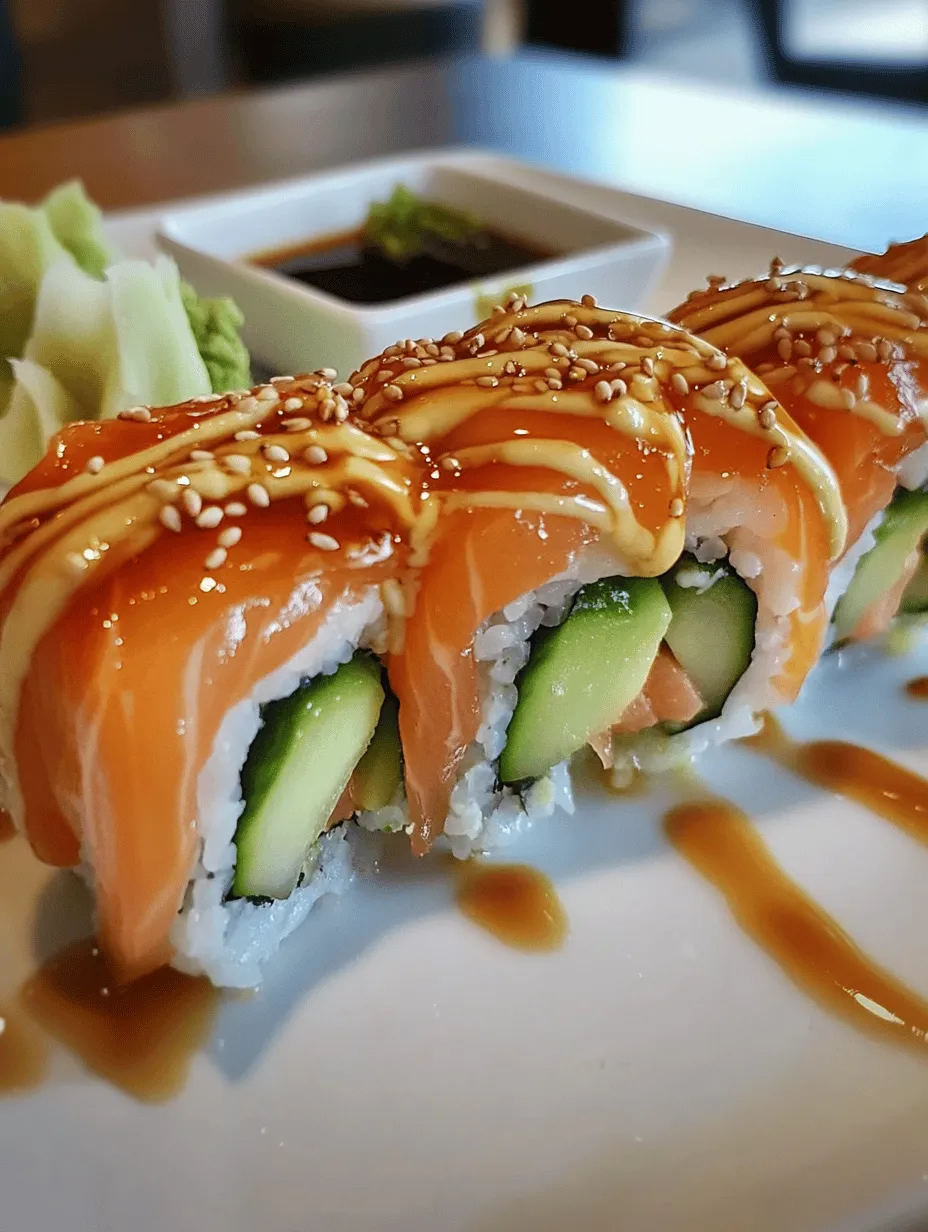
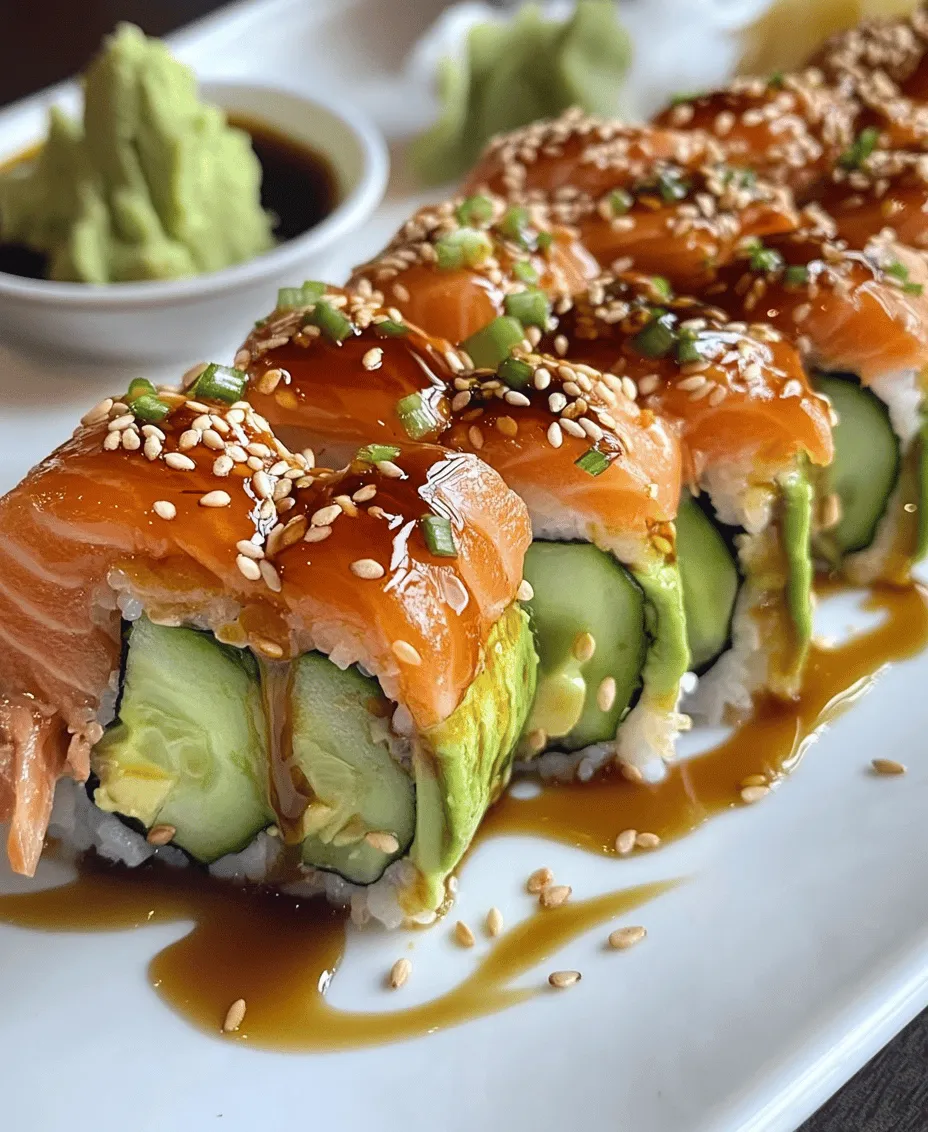
Garnishing and Serving Suggestions
Presentation is key when it comes to serving sushi, and garnishing can elevate the dish from simple to stunning.
Ideas for Garnishing Sushi Rolls:
– Toasted sesame seeds are a classic addition that adds flavor and texture.
– Thinly sliced green onions or chives can provide a pop of color and a mild onion flavor.
– A sprinkle of furikake (a Japanese seasoning) can add a unique twist.
Presentation Tips:
– Arrange the sushi pieces on a beautiful platter, and consider adding a few slices of pickled ginger and a small dollop of wasabi on the side.
– Drizzle some soy sauce in a small dish for dipping and place it alongside the sushi for an inviting presentation.
The Role of Wasabi and Pickled Ginger: Wasabi adds a delightful heat that complements the sushi, while pickled ginger serves as a palate cleanser between different types of sushi. Both elements enhance the overall sushi experience and aid digestion.
Nutritional Information
Understanding the nutritional benefits of your baked salmon sushi roll can help you appreciate the healthfulness of this meal.
Overview of Nutritional Benefits:
– The baked salmon is a great source of high-quality protein and omega-3 fatty acids, which are vital for heart health.
– Sushi rice provides carbohydrates, while vegetables like cucumber and avocado contribute essential vitamins and minerals.
Discussion on Serving Sizes and Macronutrient Balance: A typical sushi roll can serve 2-3 people as an appetizer or 1 person as a main dish. Each roll generally contains a balanced mix of macronutrients, with protein from the salmon, healthy fats from avocado, and carbohydrates from the rice.
Comparison to Traditional Options: Compared to traditional fried or heavily sauced sushi options, baked salmon sushi rolls are lighter and healthier. By opting for baking over frying, you can enjoy the same delicious flavors without the added calories and unhealthy fats.
Variations and Customizations
One of the best aspects of making sushi at home is the ability to customize it to your liking.
Suggestions for Alternative Fillings:
– Experiment with different proteins like shrimp, crab, or even tofu for a vegetarian option.
– Incorporate a variety of vegetables, such as bell peppers, carrots, or even mango for a sweet touch.
Ideas for Different Sauces or Seasonings:
– A drizzle of spicy mayo or eel sauce can add depth to your sushi rolls.
– You can also sprinkle some chili flakes or sriracha for those who enjoy a bit of heat.
Adapting the Recipe for Dietary Restrictions:
– For a gluten-free version, ensure that you use gluten-free soy sauce and check that your nori is gluten-free.
– Dairy-free options can easily be accommodated by avoiding cream-based sauces.
Conclusion
The baked salmon sushi roll is a delightful fusion of flavors and textures that is sure to impress. Its versatility allows you to experiment with various ingredients and cooking methods, making it a perfect dish to share with family and friends.
Encourage yourself to try making sushi at home, as it not only fosters creativity in the kitchen but also brings a sense of accomplishment. The joy of cooking and sharing delicious, homemade sushi is unparalleled, and you may just find that it’s easier than you initially thought. So gather your ingredients, roll up your sleeves, and dive into the wonderful world of sushi-making—your taste buds will thank you!