


Introduction
When it comes to comfort food, few dishes can compete with the warm, creamy, and indulgent nature of mac and cheese. This beloved classic has graced dinner tables across the globe, providing solace and satisfaction in every cheesy bite. Its simplicity and versatility have made it a staple in households, from casual family dinners to gourmet interpretations at upscale restaurants. However, what if we told you that there’s a way to elevate this classic dish to new heights? Enter Bacon Bliss Mac and Cheese—a savory twist that adds a rich and smoky flavor profile, transforming the traditional recipe into something truly extraordinary.
The concept of mac and cheese is already a crowd-pleaser, but by adding crispy bacon, we introduce an element of indulgence that is hard to resist. Bacon not only enhances the flavor but also provides a delightful textural contrast to the creamy cheese sauce. Whether you’re hosting a gathering, preparing a cozy meal for your family, or simply indulging in a solo dinner treat, Bacon Bliss Mac and Cheese is sure to impress. This dish is perfect for sharing with friends or enjoying by yourself as you unwind after a long day.
In this article, we will explore the components that make up this delicious recipe and guide you through the step-by-step process of creating your very own Bacon Bliss Mac and Cheese.
Understanding the Ingredients
To achieve the ultimate Bacon Bliss Mac and Cheese, it’s essential to understand the key ingredients that come together to create this mouthwatering dish. From the pasta to the cheese and the smoky bacon, each component plays a critical role in crafting a flavor-packed experience.
Essential Components of Mac and Cheese
At its core, mac and cheese consists of three primary components: pasta, cheese, and a creamy sauce. Each of these elements contributes to the overall appeal of the dish.
Pasta Selection: Elbow Macaroni
When it comes to pasta, elbow macaroni reigns supreme for mac and cheese recipes. Its small, curved shape allows the cheese sauce to cling to every nook and cranny, ensuring that each bite is filled with cheesy goodness. While you may be tempted to experiment with other pasta shapes, such as shells or fusilli, sticking to traditional elbow macaroni will yield the best results, allowing for a perfect blend of texture and flavor.
The Role of Cheeses: Sharp Cheddar and Mozzarella
Cheese selection is crucial in achieving that gooey, creamy texture that we all crave in mac and cheese. For this recipe, we recommend using a combination of sharp cheddar cheese and mozzarella.
– Sharp Cheddar: This cheese brings a bold, tangy flavor that cuts through the richness of the dish, enhancing its overall taste.
– Mozzarella: Known for its excellent melting qualities, mozzarella adds a delightful creaminess and stretchiness to the cheese sauce. This combination of cheeses creates a balanced flavor profile, ensuring that your mac and cheese is both flavorful and indulgent.
The Addition of Bacon as a Flavor Enhancer
Now, let’s talk about the star ingredient: bacon. Adding crispy bacon to mac and cheese not only imparts a smoky richness but also elevates the dish to a whole new level of deliciousness. The savory notes of the bacon complement the creamy cheese sauce perfectly, creating a harmonious blend of flavors that will leave your taste buds dancing. When selecting bacon for this recipe, look for thick-cut varieties that will hold up well during cooking and provide that satisfying crunch.
Supporting Ingredients
In addition to the main components, several supporting ingredients help to round out the dish and contribute to its overall flavor and texture.
– Butter and Flour for the Roux: To create the cheese sauce, you’ll need butter and flour to make a roux. This combination serves as the thickening base for your sauce, ensuring a creamy and smooth consistency.
– Whole Milk for Creaminess: Using whole milk in your cheese sauce adds richness and creaminess, making each bite decadent. Avoid low-fat or skim milk, as they may result in a thinner sauce.
– Dijon Mustard and Smoked Paprika for Flavor Depth: A touch of Dijon mustard adds a hint of tanginess that brightens the dish, while smoked paprika introduces a warm, smoky flavor that pairs beautifully with the bacon. These ingredients provide an extra layer of complexity to the cheese sauce, ensuring that every mouthful is bursting with flavor.
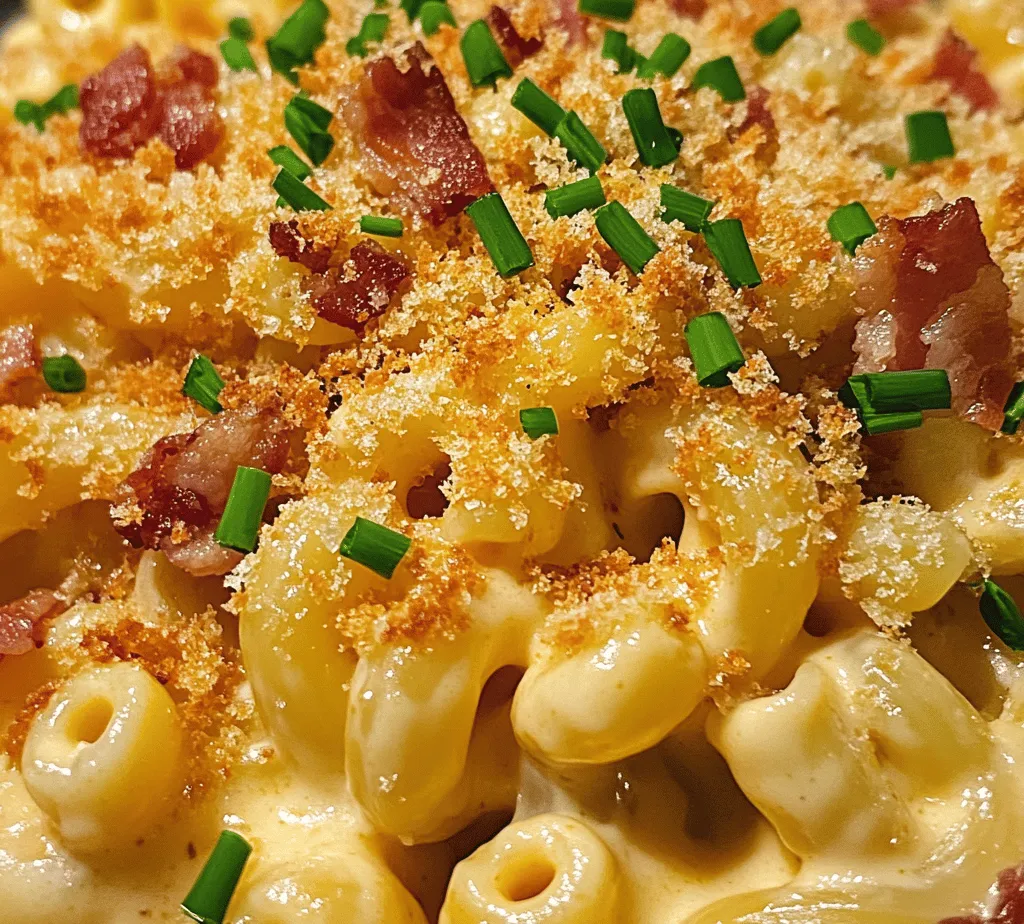
– Panko Breadcrumbs for Texture: To finish off your Bacon Bliss Mac and Cheese, a sprinkle of panko breadcrumbs provides a delightful crunch. When baked, these breadcrumbs create a golden, crispy topping that contrasts beautifully with the creamy pasta beneath.
Step-by-Step Cooking Process
Now that we’ve discussed the essential ingredients that come together to create Bacon Bliss Mac and Cheese, it’s time to dive into the cooking process. Follow these detailed steps to ensure that your dish turns out perfectly every time.
Cooking the Pasta
The first step in making Bacon Bliss Mac and Cheese is cooking the pasta. It’s crucial to follow the cooking instructions on the package and aim for an “al dente” texture. This means the pasta should be tender yet still firm to the bite, as it will continue to cook further in the oven.
1. Boil Water: Fill a large pot with water, add a generous pinch of salt, and bring it to a rolling boil.
2. Add the Pasta: Once the water is boiling, add the elbow macaroni and stir occasionally to prevent sticking. Cook according to the package instructions, usually around 7-9 minutes.
3. Drain and Set Aside: Once the pasta is cooked al dente, drain it in a colander and set it aside. Be sure not to rinse the pasta, as this can wash away the starch that helps the cheese sauce adhere.
Cooking the Bacon
Next, it’s time to cook the bacon to a crispy perfection. Crispy bacon not only adds flavor but also a satisfying crunch to your mac and cheese.
1. Prepare the Bacon: Start with thick-cut bacon strips for the best texture. Cut the bacon into small pieces (about 1-inch) to ensure even cooking and more surface area for crispy goodness.
2. Cook the Bacon: In a large skillet over medium heat, add the bacon pieces. Cook until they are crispy and browned, about 8-10 minutes, stirring occasionally to ensure even cooking.
3. Reserve Bacon Grease: Once the bacon is cooked, use a slotted spoon to transfer it to a paper towel-lined plate to drain excess grease. Do not discard the bacon grease in the skillet; instead, keep it for flavoring your cheese sauce.
Creating the Roux
The roux is a crucial component in developing a creamy cheese sauce. It acts as a thickening agent and adds richness to the dish.
1. Melt the Butter: In the same skillet with the reserved bacon grease, add 2 tablespoons of butter over medium heat. Allow it to melt completely.
2. Add the Flour: Once the butter has melted, gradually whisk in 2 tablespoons of all-purpose flour. Continue to whisk for about 1-2 minutes until the mixture is smooth and bubbly, ensuring that the raw flour taste is cooked out. This is your roux!
3. Achieve the Right Consistency: The roux should be a light golden color and have a thick consistency. If it seems too thick, feel free to add a splash of milk to loosen it up.
Developing the Cheese Sauce
With the roux ready, it’s time to turn it into a luxurious cheese sauce.
1. Add the Milk: Gradually pour in 2 cups of whole milk while continuously whisking to prevent lumps. Keep whisking until the mixture thickens and starts to bubble gently, about 5-7 minutes.
2. Incorporate the Cheeses: Remove the skillet from the heat and stir in the sharp cheddar and mozzarella cheeses, mixing until they are fully melted and incorporated into the sauce.
3. Enhance with Flavor: Add 1 teaspoon of Dijon mustard and 1 teaspoon of smoked paprika to the cheese sauce, stirring until well combined. These flavor enhancers will elevate your mac and cheese to new heights.
By following these initial steps, you’re well on your way to creating a bowl of Bacon Bliss Mac and Cheese that will delight your taste buds and warm your heart. Stay tuned for the next part of the article, where we will cover the final assembly, baking instructions, and tips for achieving the best results.
Gradual Incorporation of Milk to Avoid Lumps
When preparing the cheese sauce for your Bacon Bliss Mac and Cheese, it is essential to incorporate the milk gradually. Begin by adding a small amount of milk to your roux (the butter and flour mixture) while whisking continuously. This method helps to avoid lumps, which can ruin the creamy texture of your sauce. As the mixture thickens, continue to add the milk in small increments, whisking thoroughly after each addition until you achieve a smooth and velvety consistency.
Understanding the Thickening Process and Its Significance
The thickening process is a critical component of making a creamy cheese sauce. When you heat the roux and gradually add the milk, the flour in the roux absorbs the liquid and swells, thickening the mixture. This process is significant because it provides the base for your cheese sauce, ensuring it clings beautifully to the pasta. A well-thickened sauce will create that luscious mouthfeel that makes mac and cheese so satisfying.
Flavoring the Sauce with Spices and Seasonings
Now that you have a smooth base, it’s time to elevate the flavor of your cheese sauce. Consider adding a pinch of salt and black pepper to taste. For an extra layer of flavor, you can include garlic powder, onion powder, or even a dash of cayenne pepper for a little heat. Stir these spices into the sauce while it’s simmering, allowing them to infuse their flavors as the sauce thickens. This step is crucial to ensure each bite of your Bacon Bliss Mac and Cheese is packed with flavor.
Combining Ingredients
With your cheese sauce perfectly flavored, it’s time to combine it with the cooked pasta and crispy bacon. First, ensure that your pasta is al dente, as it will continue to cook in the oven. Drain the pasta and return it to the pot or a large mixing bowl. Pour the cheese sauce over the pasta, ensuring that every noodle is coated. Next, fold in the crispy bacon pieces, distributing them evenly throughout the mixture. This balance of cheese, pasta, and bacon is what truly defines the “bliss” in Bacon Bliss Mac and Cheese.
Whisking in Cheeses for a Smooth Sauce
To achieve that ultimate creamy texture, it’s essential to whisk the cheeses into the sauce gradually. Start with a blend of shredded sharp cheddar and creamy mozzarella for that perfect balance of flavor and meltiness. Stir in the cheeses a handful at a time, ensuring they fully melt into the sauce before adding more. This gradual incorporation not only achieves a smooth sauce but also prevents clumping, resulting in a beautifully cohesive dish.
Importance of Combining Pasta and Bacon Evenly
Once your cheese sauce is ready, it’s crucial to combine the pasta and bacon evenly. This ensures that every forkful of your Bacon Bliss Mac and Cheese is a delightful mix of flavors and textures. Take your time to gently fold the ingredients together, ensuring that the cheese sauce clings to every piece of pasta and that the crispy bacon is distributed throughout. This step is key to creating a harmonious dish that delights the palate.
Baking the Mac and Cheese
Preparing for the Oven
Before baking, it’s important to prepare your baking dish properly. Preheat your oven to 350°F (175°C), allowing it to reach the desired temperature while you finish assembling your mac and cheese. Greasing the baking dish with butter or cooking spray will help prevent sticking and ensure easy serving once it’s done baking.
Importance of Preheating and Greasing the Baking Dish
Preheating the oven is crucial for achieving even cooking and a perfect crust. If the oven is not hot enough when the dish goes in, the mac and cheese may not bake evenly, resulting in a gooey texture instead of a beautifully baked finish. Greasing the dish also helps to create that golden, crispy exterior while allowing for easy cleanup afterward.
Topping the Dish
No mac and cheese is complete without a delicious topping. For Bacon Bliss Mac and Cheese, a panko breadcrumb topping is highly recommended. The panko breadcrumbs provide a delightful crunch that contrasts beautifully with the creamy pasta beneath. To enhance the flavor, mix the panko with a drizzle of olive oil and some grated Parmesan cheese. This combination not only adds richness but also contributes to a beautifully browned crust.
Baking Instructions
Once your mac and cheese is assembled and topped, it’s time to bake it. Place your dish in the preheated oven and bake for approximately 25 to 30 minutes. During this time, the cheese will bubble, and the topping will turn a lovely golden brown. For an extra crispy crust, consider broiling the dish for the last few minutes of baking, keeping a close eye to prevent burning.
Tips for Achieving a Perfect Golden Crust
To achieve that perfect golden crust, ensure your panko topping is evenly distributed. You can also sprinkle a little extra cheese on top if you desire an even cheesier finish. If you’re using the broil function, watch closely; it can go from perfectly browned to burnt in a matter of seconds.
Serving Suggestions
Ideas for Garnishing with Fresh Herbs
Once your Bacon Bliss Mac and Cheese is out of the oven and slightly cooled, consider garnishing it with fresh herbs. Chopped parsley or chives can add a pop of color and a fresh flavor that complements the richness of the dish. A sprinkle of smoked paprika can also enhance the visual appeal and add a subtle smokiness that ties in perfectly with the bacon.
Pairing Options: Sides and Beverages that Complement the Dish
Bacon Bliss Mac and Cheese is a hearty dish, so pairing it with lighter sides can create a well-rounded meal. Consider serving it alongside a simple green salad with a zesty vinaigrette to cut through the richness of the cheese. For beverages, a crisp white wine like Sauvignon Blanc or a light lager can complement the flavors beautifully. If you’re looking for non-alcoholic options, a sparkling water with a slice of lemon can be refreshing.
Ideal Occasions for Serving Bacon Bliss Mac and Cheese
This dish is perfect for various occasions, whether it’s a cozy family dinner, a festive gathering with friends, or even a potluck event. Its comforting nature and the indulgent combination of bacon and cheese make it a crowd-pleaser that is sure to impress. Consider serving it at game day parties or holiday celebrations when comfort food is a must.
Nutritional Information
Overview of Calorie Content per Serving
While Bacon Bliss Mac and Cheese is undoubtedly a rich and indulgent dish, it’s helpful to be mindful of its nutritional content. A typical serving can contain around 500 to 700 calories, depending on the portion size and the specific ingredients used.
Breakdown of Key Nutrients (Protein, Fat, Carbohydrates)
In terms of nutritional breakdown, each serving generally provides a decent amount of protein, primarily from the cheese and bacon. You can expect about 20-25 grams of protein per serving, alongside a higher fat content due to the cheese and bacon. The carbohydrates mainly come from the pasta, contributing around 50-60 grams per serving.
Discussion on Balancing Indulgence with Nutrition
While Bacon Bliss Mac and Cheese is a treat, it’s important to balance indulgence with nutrition. You can make a few healthier adjustments, such as using whole grain pasta, reducing the amount of cheese, or even incorporating vegetables like spinach or broccoli into the mix. These modifications can enhance the nutritional profile without sacrificing too much of the delicious flavor.
Conclusion
Bacon Bliss Mac and Cheese is the epitome of comfort food, combining the creamy richness of cheese with the savory goodness of bacon. The joy of making this dish lies not only in the cooking process but also in the satisfaction of serving a meal that brings people together. Whether enjoyed during a cozy night in or at a lively gathering, this mac and cheese recipe offers a perfect blend of indulgence and flavor.
We encourage you to try this recipe and experience the bliss for yourself. Share your experiences and any personal twists you add to this classic dish, and let the world know how bacon can elevate even the simplest recipes into extraordinary culinary creations.
